
Home NAS · Mac backup
UGREEN DH2300 Time Machine setup: Bonjour, the quota and the first backup
The NAS shows up in Finder. Your files are right there. Then you open Time Machine, click Add Backup Disk, and the list is empty. That gap is one switch most people miss. Here's the whole setup in the order that works, plus how much space to give it.
By Adam Anderson, Editor and CEO, Gearsentials
This article contains paid Amazon links. Gearsentials may earn a commission from qualifying purchases. Affiliate standards.
The NAS in this guide
Paid links. Gearsentials may earn a commission from purchases.
Why a NAS, and why now
A USB drive on your desk is still the most common Time Machine setup, and it works. The catch is that a laptop only backs up when it's plugged in. A NAS on your network backs up a MacBook whenever it's home and awake, and one box can hold backups for more than one Mac.
There's also a deadline for some readers. Apple's list of Time Machine backup disks says a third-party NAS works when it supports Time Machine over SMB. Old AirPort Time Capsules and AFP-based network backups are no longer recommended, and AFP isn't supported in macOS 27 or later. If a Time Capsule has been quietly backing up your Mac for years, it's time for a replacement.
The DH2300 is a fair fit for that job. It's UGREEN's two-bay starter NAS, sold without drives, and Cult of Mac's reviewer used it for Time Machine backups of a Mac mini and a MacBook Pro. Once Bonjour was on, they called the setup a breeze. That Bonjour step is the one this guide spends the most time on.
Before you start, check versions. UGREEN's Mac setup guide says its Time Machine workflow needs UGOS firmware 1.9.0.0035 or later and macOS Monterey 12 or later.
Step 1: Make a folder just for backups
Sign in to UGOS and create a new shared folder for Time Machine. Call it something obvious. UGREEN says not to mix documents or media into it, and Apple says the same thing about any backup disk: use it for Time Machine only.
There's a practical reason beyond tidiness. Time Machine doesn't store a folder tree of your files. Each Mac gets one big sparsebundle image. UGREEN warns not to delete files from inside it on the NAS side, because that can break the whole backup instead of freeing space. A dedicated folder makes that mistake much harder to make.
Use a normal user account for the Mac, not the NAS admin login. UGREEN suggests individual standard accounts, and it means the password saved on your Mac can't change NAS settings.
How big to make the quota
Without a quota, Time Machine will happily fill the whole storage pool. Apple's Time Machine guide says to use a backup disk with at least twice your Mac's storage. UGREEN turns that into starting quotas:
| Mac storage | Starting quota |
|---|---|
| 512GB | 1TB |
| 1TB | 2TB |
| 2TB | 4TB |
| 4TB | 8TB |
Size it from the drive inside the Mac, not how full it is today. A mostly empty 1TB MacBook still needs room to grow. Sharing one folder between Macs? Add them up. UGREEN's example is a 512GB Mac plus a 1TB Mac, which works out to about 3TB. Keep in mind that one fast-growing Mac can eat into the others' share.
To set it, open the Files app in UGOS, go to Management, then Shared folder management. Find the Time Machine folder, click Edit, and on the General tab turn on Capacity quota and enter the size.
This is where your drive choice matters. On a two-bay box, a RAID 1 mirror gives you roughly one drive of space. If you're backing up two 1TB Macs and also storing photos, small drives fill up fast. And remember that the mirror protects against a dead drive, not a deleted file. Time Machine is the part that lets you go back in time.
UGREEN NASync DH2300
Paid links. Gearsentials may earn a commission from purchases.
Two-bay diskless NAS, ASIN B0FNWHSPXF. Drives are sold separately, so plan the Time Machine quota before you pick a drive size.
Step 2: Turn on SMB and Bonjour
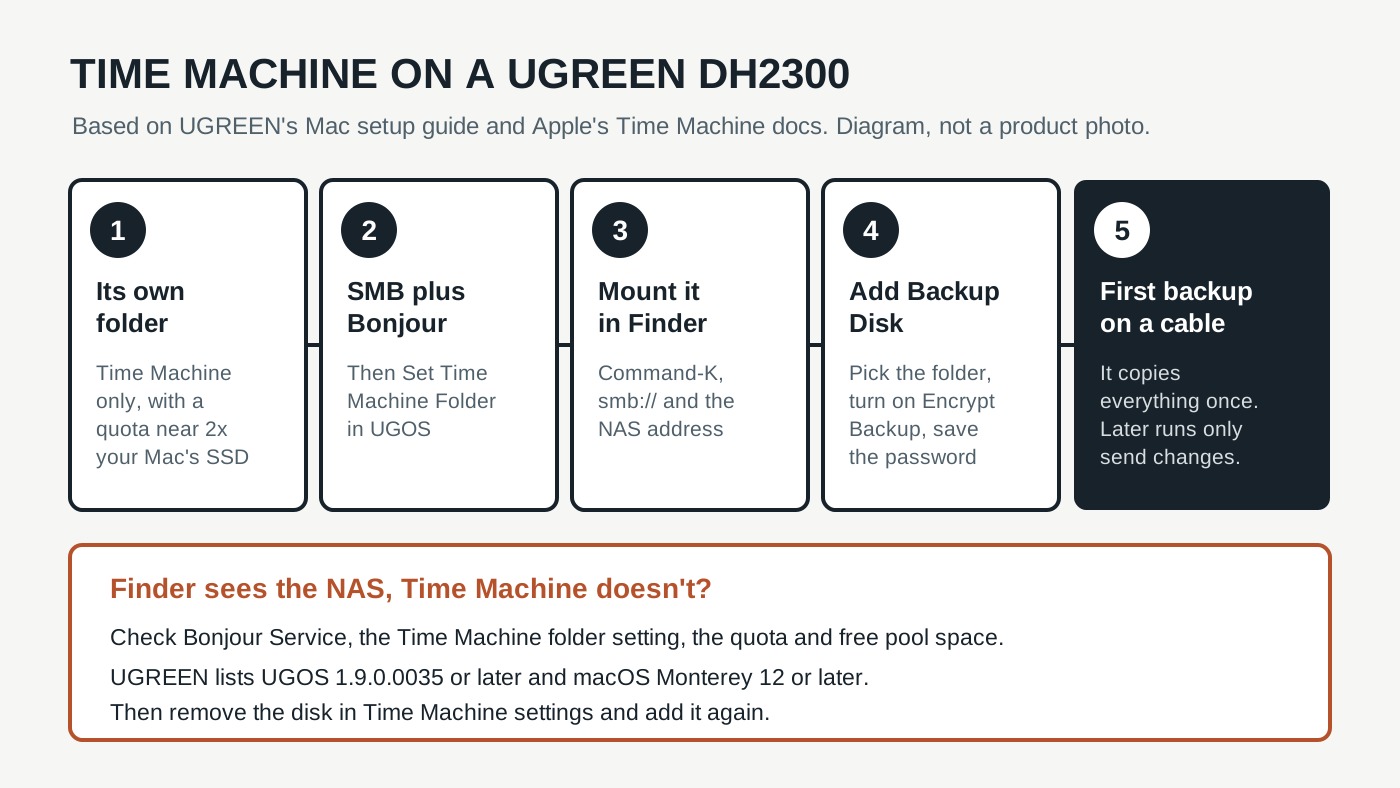
Here's the switch most people miss. In UGOS, open Control Panel, File Service, SMB. Make sure SMB is on. Then open the advanced settings, turn on Bonjour Service, click Set Time Machine Folder, pick the folder from step 1 and save.
Bonjour is how a Mac finds a Time Machine destination on the network. UGREEN points out that Finder can reach the NAS without it. That's why so many people see their files in Finder and then find nothing in Time Machine. Finder working only proves that SMB and your password are fine.
Step 3: Add it on the Mac
- In Finder, press Command-K and type
smb://followed by the NAS's IP address. If you don't know it, UGREEN saysfind.ugnas.comlists UGREEN devices on your local network. - Sign in with the NAS account and mount the Time Machine folder.
- Open System Settings, General, Time Machine, and click Add Backup Disk.
- Pick the UGREEN folder and click Set Up Disk. Enter the NAS login again if asked.
Turn on Encrypt Backupwhen it's offered. UGREEN explains that the Mac then encrypts the backup before it lands on the NAS, so someone with only the share password still can't read it. Apple notes you'll need that backup password to restore anything. Put it in your password manager now. Lose it, and the backup can be lost with it.
Step 4: Run the first backup on a cable
The first backup copies everything you selected. After that, Time Machine only sends changes. Apple says it keeps hourly backups for the past 24 hours, daily backups for the past month and weekly backups after that, and deletes the oldest when the disk is full. On a NAS, "full" means your quota.
Do that first run over Ethernet if you can. UGREEN recommends it, and the DH2300 has one gigabit port, per TechRadar's spec list. That's plenty for nightly changes. For the big first copy, Wi-Fi distance and interference are usually the slow part, so a cable to the Mac (or a USB-C Ethernet adapter on a MacBook) saves hours of waiting.
What happens when you leave the house with a MacBook? Apple's local snapshots page says Time Machine saves a snapshot on the Mac about every hour and keeps it for 24 hours. That helps you undo a recent mistake on the road. It isn't a backup, because it lives on the same Mac. The real backup resumes when you're home and on the network.
When Time Machine can't see the NAS
Work through UGREEN's checklist in this order:
- SMB is on in UGOS.
- Bonjour Service is on.
- A shared folder is set as the Time Machine folder.
- That folder is mounted in Finder with the right NAS account.
- The Mac and NAS are on the same local network.
- The folder quota and the storage pool both have free space.
- The UGOS and macOS versions meet the minimums above.
- Remove the disk in Time Machine settings and add it again.
If backups worked for a while and then fail with a full disk, check the folder quota, the NAS Recycle Bin and the whole storage pool. Time Machine trims old backups as it runs out of room, but it can't go past the quota you set. Raising the quota is fine. Digging into the sparsebundle to delete things isn't.
Once you've had one good backup, you can check it. Hold Option while opening the Time Machine menu and choose Verify Backups. Starting over with a fresh backup should be the last resort, because it throws away your history and starts another full copy.
The final decision
The DH2300 does Time Machine well once you know the one trick: Finder access isn't enough, so turn on Bonjour and mark the folder for Time Machine. Give that folder its own quota at about twice your Mac's storage, encrypt the backup, and run the first copy over a cable.
It's a good buy if you're replacing a Time Capsule before AFP goes away, or you have a MacBook that never stays plugged into a USB drive. It also makes sense for a household with two Macs and a pile of phone photos that need a home. Pair it with two matched drives in RAID 1 if you want the backup to survive a dead drive.
Skip it if one desktop Mac never leaves the desk. A USB drive that stays plugged in is simpler and needs no network setup. And don't treat the NAS as your only copy of anything that matters. One box in one house is still one box. Set the quota, check that the first backup finishes, and you're done.
If you're moving Time Machine to a NAS
Paid links. Gearsentials may earn a commission from purchases.
Best for MacBook owners and Time Capsule replacements who want automatic backups at home. Sold without drives; check UGREEN's compatibility list before you buy them.
Still deciding on the NAS itself? Our UGREEN DH2300 vs Synology BeeStation Plus comparison covers total cost with drives, RAID 1, Plex and what happens when something fails.